Using Python and OpenAI to generate and resize images (#dev #python #openai #ai #aiart)

Overview
Since everyone and their dogs are either using OpenAI (API or ChatGPT) to create content, I decided to join the party and write a tutorial showing a simple way to use the OpenAI (not ChatGPT) to automate the process of generating images from a prompt, and then creating variants of that image in different sizes.
Whether you're looking to experiment with AI-generated art or automate image resizing tasks, this post will help you get started.
Quick note before we start
I'm not responsible for anything you do. If you create something that is offensive, illegal, or harmful, that's on you. Also if you accidentaly post your API Key to GitHub or something and then receive a bill for thousands of dollars, that's also on you. Be carefaul with your API Key and use it responsibly.
Getting started with OpenAI
So, as you may imagine, OpenAI is not free, so you'll need to create an account there and get an API key. From their site:
First, create an OpenAI account or sign in. Next, navigate to the API key page and "Create new secret key", optionally naming the key. Make sure to save this somewhere safe and do not share it with anyone.
I also higly recommend that you access the Usage: Cost page and set a budget limit for your account. This way you won't get a surprise bill at the end of the month.
For my tinkering needs, a budget limit of $20 bucks (USD) is more than enough. The code in this script eat $0.08 of my monthly budget.
What we'll be doing
The script we'll be creating will call the OpenAI API to generate an image based on a prompt + model configuration, and then it will create different versions of that image with different sizes, but this will be done locally, so you won't be charged for that.
Installing the required libraries
For this, we'll need the following libraries:
- OpenAI's Python library
- Pillow (PIL)
- Requests
- Io
- Types
- PathLib
- PPrint
Luckly, most of those are already installed in your Python environment, so you'll only need to install the following:
1pip install --upgrade openai
2pip install --upgrade Pillow
Basic parameters
This might change in the future, but for now we can use 2 models for this: dall-e-2 and dall-e-3.
So, if we want to allow for more flexibility, we should create a way to define the allowed values and parameters for each
of those models.
In this case we'll use a dictionary to store the parameters for each model.
Explaining what each parameter means:
max_prompt_size: The maximum number of characters allowed for the prompt.n: The number of images to generate.quality: The quality of the generated image.response_format: The format of the response.size: The size of the generated image.style: The style of the generated image.
After reading the documentation, for model dall-e-2 we have:
 1{
 2    "max_prompt_size": 1000,
 3    "n": {
 4        "min": 1,
 5        "max": 10
 6    },
 7    "quality": None,  # Not supported.
 8    "response_format": [
 9        "url",  # Only available for 60 minutes after the request
10        "b64_json"
11    ],
12    "size": [
13        "256x256",   # Square
14        "512x512",   # Bigger square
15        "1024x1024"  # Even Bigger square
16    ],
17    "style": None  # Not supported.
18}
And for model dall-e-3 we have:
 1{
 2    "max_prompt_size": 4000,
 3    "n": {
 4        "min": 1,
 5        "max": 1
 6    },
 7    "quality": ["standard", "hd"],
 8    "response_format": [
 9        "url",  # Only available for 60 minutes after the request
10        "b64_json"
11    ],
12    "size": [
13        "1024x1792",  # Portrait
14        "1792x1024",  # Landscape
15        "1024x1024"   # Square
16    ],
17    "style": ["vivid", "natural"]
18}
Feel free to change those later, but I'll use dall-e-3 as the default model for this script and the following config:
- n: 1
- quality: standard
- response_format: url
- size: 1024x1792
- style: vivid
Since we already have the allowed configuration for each model, I'll create the default config like this:
1from types import MappingProxyType
2
3default_config = MappingProxyType({  # Immutable dictionary
4    "n": params[default_model]["n"]["min"],
5    "quality": params[default_model]["quality"][0],
6    "response_format": params[default_model]["response_format"][0],
7    "size": params[default_model]["size"][0],
8    "style": params[default_model]["style"][0]
9})
The reason I'm using MappingProxyType is to make the dictionary immutable, so we can't change the values later and we
can use it as the default value of an argument without the linter yelling at us.
Generating the image
Now that we have the default configuration, we can create a function that will call the OpenAI API to generate the image. This function will return the URL of the generated image, and will receive the following arguments:
- Prompt - str;
- model - str (default: dall-e-3);
- config - dict (default: default_config).
Since we're receving arguments, we need to make sure that their are valid.
Validating model name
To validate the model, we're checking if we have a model name and if it's valid, and we can do this with this function:
1def _ensure_model_name_is_valid(model: str):
2    if model is None:
3        raise ValueError("Model name cannot be None.")
4
5    if model in params:
6        return
7
8    raise ValueError(f"Model name must be one of the following: {', '.join(params.keys())}")
Validating prompt
This is even simpler to check. We just need to make sure we have a prompt and it's within the allowed size. If this was a produciton level code, we could also check if this was a malicious prompt, etc., but for now life is simple.
 1def _ensure_prompt_is_valid(prompt: str, model: str):
 2    max_prompt_size = params[model]["max_prompt_size"]
 3
 4    if prompt is None:
 5        raise ValueError("Prompt cannot be None.")
 6
 7    if len(prompt) <= max_prompt_size:
 8        return
 9
10    raise ValueError(f"Prompt must be less than or equal to {max_prompt_size} characters.")
Validating config
This is a bit more complex, since we need to check if the values are valid for the model we're using. I'm not going to worry too much about optimization here, so I'll just check every config value against the model definitions.
Note: I could create a function to sanitize the config values, but this post is already big enough.
 1def _ensure_config_is_valid(config: dict, model: str):
 2    for key, value in config.items():
 3        if key in params[model]:
 4            if value is None:
 5                raise ValueError(f"Value for key '{key}' cannot be None.")
 6
 7            if key == "n":
 8                if value < params[model][key]["min"] or value > params[model][key]["max"]:
 9                    raise ValueError(f"Value for key '{key}' must be between {params[model][key]['min']} and {params[model][key]['max']}.")
10
11            if key == "quality":
12                if value not in params[model][key]:
13                    raise ValueError(f"Value for key '{key}' must be one of the following: {', '.join(params[model][key])}")
14
15            if key == "response_format":
16                if value not in params[model][key]:
17                    raise ValueError(f"Value for key '{key}' must be one of the following: {', '.join(params[model][key])}")
18
19            if key == "size":
20                if value not in params[model][key]:
21                    raise ValueError(f"Value for key '{key}' must be one of the following: {', '.join(params[model][key])}")
22
23            if key == "style":
24                if value not in params[model][key]:
25                    raise ValueError(f"Value for key '{key}' must be one of the following: {', '.join(params[model][key])}")
Generating the image
So now that we have the validation functions, let's move on to the function that will actually call the OpenAI API.
First thing we call the validation functions we just created:
1_ensure_model_name_is_valid(model)
2_ensure_prompt_is_valid(prompt, model)
3_ensure_config_is_valid(config, model)
Then we crete the OpenAI client:
1import openai
2
3client = openai.OpenAI(api_key="ab-proj-1234567890")
And then we make the request to generate the image:
1response = client.images.generate(
2    prompt=prompt,
3    model=model,
4    **config
5)
In this code, we explictly pass the prompt, and the model. The config we create, I'm using a dictionary unpacking to pass the values as keyword arguments (like what we do in TypeScript...)
This is a blocking call and will raise an exception if something goes wrong, so we can just return the URL of the generated:
1return response.data[0].url
And that's it! So far, we have a function that will generate an image based on a prompt and return the URL of the generated image in a flexible enough way that we can easily change the parameters of the request. If that's all you wanted, you can stop here and use this function in your projects.
Downloading the image
So now we have the URL of the generated image, we can download it and save it to a file. Since we're generating variations
of this image, we'll add the word original to this filename.
This function will receive two arguments:
- url - str;
- filename without the extension - str.
Going to trust the process and won't validate those inputs, but you could.
First thing we do is to make a request to the URL and get the image data:
1import requests
2response = requests.get(image_url)
To make sure nothing went wrong, and since we're already raising errors in case of failure, we can do this:
1response.raise_for_status()
If no exception was raised, we can safely load the image to a Pillow object:
1from io import BytesIO
2from PIL import Image
3
4original_image = Image.open(BytesIO(response.content))
Now let's adjust the filename:
1original_filename = f"{filename_without_ext}_original.jpg"
And save the image:
1original_image.save(original_filename)
Since we're generating variations of this image, let's gather some details and return them:
 1# Get the image width and height
 2original_width, original_height = original_image.size
 3
 4# Calculate the ratio
 5ratio = original_height / original_width
 6
 7# Return the image details
 8return {
 9    "filename_without_ext": filename_without_ext,
10    "original_filename": original_filename,
11    "image_object": original_image,
12    "path": Path(original_filename),
13    "width": original_width,
14    "height": original_height,
15    "ratio": ratio
16}
Lastly but not least: Creating variations of the image
Now that we have the original image, we can create variations of it with different sizes. This last function will receive the following arguments:
- image details - dict;
- target_widths - list (default: [256, 512, 1024]);
Since we're creating variations of the iamge, let's save some details of each image, starting with the original one:
1images = {
2    "original": {
3        "filename": image_details["original_filename"],
4        "path": image_details["path"],
5        "width": image_details["width"],
6        "height": image_details["height"]
7    }
8}
We're going to loop through the target widths and create the variations of the image. For each loop, we will:
Define the height of the image, based on the width:
1height = int(width * image_details["ratio"])
For convenience sake, we'll create a variable with the size of the image:
1size = f"{width}x{height}"
Since we have the image object, we can simply resize it multiple times:
1resized_image = image_details["image_object"].resize((width, height))
Now we define a filename for this image:
1filename = f"{image_details['filename_without_ext']}_{size}.jpg"
Then we save the file:
1resized_image.save(filename)
And lastly, we save the details of this image:
1from pathlib import Path
2
3images[size] = {
4    "filename": filename,
5    "path": Path(filename),
6    "width": width,
7    "height": height
8}
After the for loop, we return the images:
1return images
Orchestrating everything
Now that we have all the functions we need, we can create a the script part that will call those functions in the correct order and generate the images.
 1if __name__ == '__main__':
 2    # Prompt for the image
 3    img_prompt = "A cute corgi dog in a space suit, floating in space, and trying to reach a tasty treat."
 4
 5    print("Generating image...")
 6    generated_image_url = generate_image(img_prompt)
 7
 8    print("Downloading generated image...")
 9    original_image_details = download_image(generated_image_url, "doggo_in_space")
10
11    # Define the desired target widths
12    desired_target_widths = [780, 500, 342, 185, 154, 92]
13
14    print("Creating image variants...")
15    generated_images_details = create_variants(
16        image_details=original_image_details,
17        target_widths=desired_target_widths
18    )
19
20    print("Image processing completed.")
21    print("Generated image details:")
22    pprint(generated_images_details)
You could also ask the user for the prompt, or change some configurations, etc.
Example usage
In the script, I used the following prompt:
A cute corgi dog in a space suit, floating in space, and trying to reach a tasty treat.
And that was the result (that costed me USD$0.08) 🐶: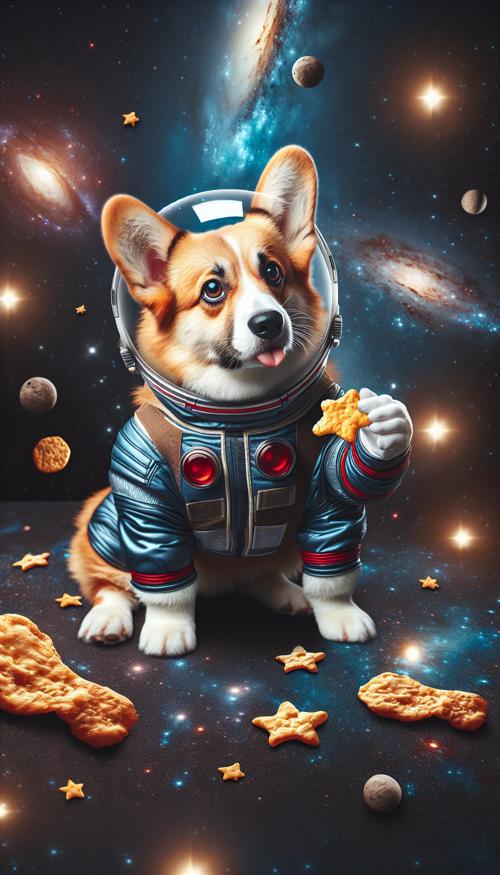
A cute corgi dog in a space suit, floating in space, and trying to reach a tasty treat.
If you want the full script, you can get a full (including the resulting images) working version (sans the API Key) here.
Hope that helps. 🙂